Intuitive eating is an approach to food that focuses on identifying and trusting your hunger cues. Studies show that it’s associated with: – Positive body image and self-esteem – Lower rates of disordered eating – Higher general well-being Intuitive eating isn’t a free-for-all —… pic.twitter.com/I7IYddV90a
On Friday’s #BBCMorningLive Dr Punam’s looking at the latest health news including how music could help people with dementia and that scientists may have found the cause of Multiple Sclerosis. If you have any health questions, email us morninglive@bbc.co.uk or reply below
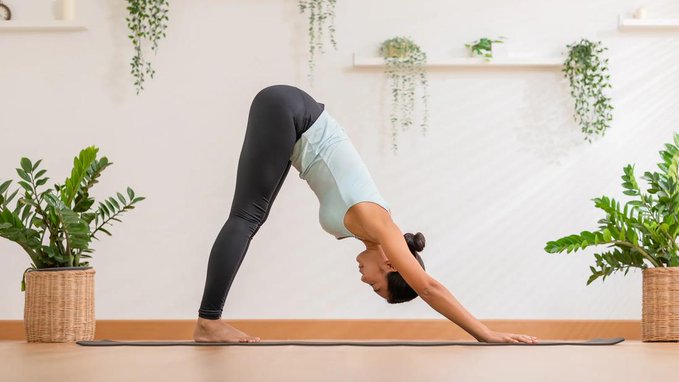
This transitional and restorative yoga pose provides a full-body stretch
Physical therapist Dawn Lorring, PT, MPT, walks through the steps of how to do downward dog correctly and shares its many benefits.
From beginner’s yoga to more advanced practices, downward dog is one of the most popular poses…with a few common misconceptions.
Rounding your back, placing your feet too far apart or putting too much weight into your wrists can all create a deeper stretch than intended — which increases your risk of injury.
Physical therapist Dawn Lorring, PT, MPT, walks through the steps of how to do downward dog correctly and shares its many benefits.
What is downward dog?
Downward dog (also known as downward facing dog, facing dog pose or Adho Mukha Svanasana in Sanskrit) is a foundational yoga pose. It’s often used as a transition between movements, like sun salutations. It’s also a form of active resting, active stretching and strengthening. This allows you to check in with yourself and re-evaluate your intentions during your practice.
You do downward facing dog by putting your body into an inverted V-shape (or pyramid), as if there were a straight line that runs through the top of your head up your spine and out of your butt toward the ceiling.
How to properly do downward facing dog
Facing dog pose won’t usually be your first movement when doing yoga. Before trying it, it’s best to loosen up your muscles and joints and find ways to work it into your overall yoga practice.
Once you’re warmed up and ready to go, follow these steps:
Start on all fours with your hands shoulder-width apart and your knees in line directly behind your hips.
Spreading your fingers wide, press down into your hands and tuck your toes (almost like you’re using them to grip the floor beneath you).
As you exhale, bring your hips up and back, as if there’s a string pulling your butt toward the ceiling, so your body creates an inverted V-shape (or pyramid).
Focus on straightening your back, not rounding it, so your head and neck are relaxed between your upper arms. It helps to focus on pressing through your arms to “push” the ground away from you and keep your arms active.
Keep your legs straight and, if it’s comfortable for you to do so, try to drop your heels down to the floor.
Adjust your posture by shifting your weight between your hands and feet until you sink comfortably into the position.
Hold this pose for 10 to 15 seconds at a time, making sure to breathe throughout.
For a more relaxed stretch, bend your knees a little and readjust your posture as needed.
When you’re done, exhale and move into your next pose or slowly lower yourself to the floor to enter child’s pose.
“Downward facing dog isn’t about keeping your heels on the ground or holding it for long periods of time,” clarifies Lorring. “It’s really about making sure you’re going to a place that’s comfortable for you, so you can adjust your body as often as you need in this pose.”
Facing dog pose variations
If you have a hard time getting down on your hands and knees, try this wall variation:
Face the wall and place both your hands out in front of you so your palms are flat and your fingers are stretched out.
Keeping your head and back straight and your hands on the wall in front of you, slowly walk your legs backward.
As you move, walk your hands down the wall so you hinge at your hips and look directly at the floor.
Keeping your head and neck relaxed, hold this pose for 10 to 15 seconds before slowly returning to stand.
If you feel stress or discomfort in your wrists, you can modify by rolling up a towel or the edge of your yoga mat and placing the roll under the heels of your hands. This will decrease some of that pressure.
For a more challenging stretch that deeply engages your hips and hamstrings:
While in the downward facing dog position, lift one leg up and stretch it toward the ceiling.
For a deeper stretch, bend your outstretched leg back and over your body, so your knee is facing away from you.
Repeat this process with the other leg, holding the pose for as long as you feel comfortable on either side.
Downward dog benefits
Downward facing dog provides a full body stretch, while also strengthening and working your:
Adho Mukha Svanasana helps improve your flexibility and control, and provides you a moment of active rest. It also increases blood flow to your head and upper body when you’re in the inverted V position. But because of this, you should talk to your yoga instructor, athletic trainer or healthcare provider before starting this position if you have:
“Facing dog pose tries to improve flexibility but also builds the strength to control that flexibility,” says Lorring. “If you’re feeling excessive stress to a certain part of your body, then you’re probably holding the pose for too long or you’re trying to go into a range that you’re not ready for. We can help you get there.”
If you run regularly, whether it’s an easy jog around the block to stay fit or an intense training regimen to prepare for a marathon, you need proper nutrition.
Here are some tips to help keep runners well-nourished and ready to win.
Foods for Runners and Joggers
A good diet can boost your physical health and help you meet your fitness goals. Make sure your meals emphasize the following basic components:
Fruit and vegetables for vitamins, minerals and antioxidants
Lean protein such as fish, poultry, beans, lentils and tofu
Healthy fats such as olive oil, avocado and nuts
Healthy carbohydrates such as rice, whole grain breads/pastas and oatmeal
Individuals may have different optimal balances, but in general, people who include running or jogging as part of their fitness regimen should get 60% to 70% of their calories from carbohydrates, with lean protein and healthy fats each accounting for 15% to 20% of their remaining calories.
Don’t skimp on carbohydrates
Although low carbohydrate diets are popular go-to’s for people wanting to lose weight, they’re not ideal for distance runners, who thrive on carbohydrates for endurance.
That is why very low carbohydrate diets, such as the ketogenic diet, plus running is not a good idea. Experts do not recommend keto to runners unless they have been told by their doctor that this a medically safe option for them and they are being monitored while in ketosis.
Distance runners need more carbs than people who aren’t training. Undereating carbohydrates can be hard on your body and affect your recovery after your run.
Here’s why: Running uses both glucose in the blood and your stores of glycogen. Glucose is the form of sugar that circulates in the bloodstream, and glycogen is the sugar stored in your liver and muscles that acts as the primary fuel for endurance exercise.
Eating plenty of carbs helps ensure that these energy stores are ready to support your training. When those stores get too low, runners are more likely to run out of energy and “burn out” or “hit a wall” while training.
Running Diet — Vitamins and Minerals
Running changes your body and your nutritional needs. Often when people start a running regimen, they are trying to lose weight or get in shape quickly, and they don’t realize they need to adjust their diet.
Especially in women runners, dietitians report seeing a tendency to overdo the running while not eating enough, and this can have an effect on health if they do not adequately replenish lost vitamins and minerals in their diet.
For women in particular, calcium and vitamin D are essential for bone health to avoid loss of bone mineral density and the risk of stress fractures.
For more vitamin D, include these foods in your meals:
Vitamin D-fortified dairy and almond, soy or rice based beverages
Eggs
Cereal fortified with vitamin D
Tuna
Salmon
For more calcium, try:
Yogurt and cheese
Tofu
Edamame
Almonds
Canned fish with bones (such as sardines)
Iron deficiency can affect women and even have an impact on their running performance. Menstruation puts people at higher risk of iron deficiency, and if iron isn’t replenished in the diet, decreases in hemoglobin can occur and bring on anemia. Hemoglobin is what carries oxygen throughout the body, including the muscles, so if there is a deficit, the muscles may feel the effect of insufficient oxygen during exercise.
Iron-rich foods include:
Poultry and other meat
Legumes, such as peas and beans
Dark, leafy green vegetables such as kale
Dried fruits and raisins
Iron-fortified breads and cereals
Dietitians recommend eating eating iron rich foods in combination with foods high in vitamin C, such as citrus, bell peppers or berries, since vitamin C helps increase the body’s absorption of iron.
What to Eat Before Running ― and When
The best time to eat a full meal is about two to three hours before you hit the road, track or trail. Have a good source of carbs paired with protein, making sure the meal focuses on a healthy carb source.
If it’s been more than three to four hours since you’ve eaten, a carbohydrate-rich snack a half-hour before running can ensure you have adequate glucose available before you head out. Directly before a run, it’s best to stick with easy-to-digest carbohydrates to avoid gastrointestinal [GI] distress such as cramping or diarrhea.
Try these:
Bananas
Applesauce
Crackers, pretzels or cereal
White bread
Potatoes
Glucose Boosters for Long Distance Runners
If you are training for a marathon or distance event and are going to be out for over an hour, you will want to bring some fuel with you. Energy drinks, gel tubes and other sources of quick blood-glucose boosters are available, but you can also use something as simple as fruit snacks.
Try practicing with these items as you train so you can pick the formulas that are best for you, and you can work on accessing and ingesting them smoothly without breaking stride.
What foods should runners avoid?
Before a run or the night before a big race, Eidel recommends going easy on:
Spicy foods or foods overly high in fat, which can cause GI upset
Foods that are very high in fiber, which can cause gas and cramping
Caffeine ― Although it is tempting to grab a caffeine boost right before a run, runners should remember that for some people, caffeine can stimulate the GI tract, which can result in diarrhea or the need for an emergency bathroom break
Does carb-loading work?
It might. Carb loading is the practice of eating a lot of carbohydrates ― particularly those that are easily absorbed, such as white bread, pasta and rice ― for 24 to 48 hours before a big race or distance run, to shore up your body’s stores of glycogen and lessen the risk of burnout before finishing the event.
Some studies show carb loading is beneficial for people preparing for a race, but it’s important to make sure during that time you’re also allowing your body to rest and giving it time to store what you are ingesting. The number of carbohydrate grams will be differ from person to person, but in general, evidence shows carb loading can be beneficial prior to a distance event.
In contrast, casual runners likely do not need to carb load. Ensuring that their day-to-day diets include extra carbohydrates can be sufficient.
What to Eat After a Run
It’s common for people not to feel hungry after a run, but a snack or light meal of complex carbohydrates and protein within the first hour after running can help replenish glycogen stores and to support recovery and rebuild stressed muscles. For example:
Peanut butter and banana
Egg on toast
Sandwich with deli meat
Pasta with meat or plant-based protein
Veggie burger on a bun
Protein shake or smoothie
Running to Lose Weight
If you’re interested in running as part of a weight loss plan, getting adequate nutrition is a must. Even casual running or jogging burns calories and can be hard on the body. Runners can become undernourished at first because they don’t understand how much energy they’re burning when they run and what they need to properly recover.
Eating enough is also essential to building muscles, which can aid in fat burning ― a plus for people working on achieving or maintaining a healthy weight.
For optimal weight loss, your plan should not rely on running alone but also include strength training and proper nutrition.
Listen to your body
If you run regularly, you should pay attention to the effects of what you eat and when, especially on running performance. Learning what works best for you can take some time and a little trial and error, but it is worth it, since running, jogging and other regular aerobic exercise offers so many health advantages.
Always feel free to consult a dietitian or doctor, and listen to your body if you’re not keeping up with your training goals.
Intuitive eating is an approach to food that focuses on identifying and trusting your hunger cues. Studies show that it’s associated with: – Positive body image and self-esteem – Lower rates of disordered eating – Higher general well-being Intuitive eating isn’t a free-for-all —… pic.twitter.com/I7IYddV90a
You’re taking cough syrup and lozenges in an attempt to get some relief. But what about using honey for sore throat symptoms? Does this natural home remedy actually work to soothe a sore throat and cough?
In addition to having other symptoms like nasal congestion, fatigue and fever, you may develop a cough.
Honey has a long history of being used as a natural remedy. And one remedy is to soothe sore throats and help alleviate a cough.
“Research shows that honey has some antimicrobial and anti-inflammation properties. Honey can help by decreasing inflammation and irritation in your throat,” explains Dr. Rainbolt. “Another study shows that honey may reduce mucus secretion. So, you can use honey for cough symptoms as well, whether it’s a wet or dry cough.”
Is it safe for children?
Giving honey to a child under 1-year-old isn’t recommended, warns Dr. Rainbolt.
“There’s concern for an infant botulism, a serious illness that’s caused by Clostridium botulinum,” she continues. “While it’s a rare occurrence, honey can contain spores that cause botulism. It attacks the body’s nervous system and children under one are more vulnerable.”
How to use for a sore throat
Most sore throats tend to get better within a week, but during that time, adults can take a spoonful (about 1 teaspoon) of honey for a cough and sore throat.
You can also dilute half a teaspoon to 1 teaspoon of honey in warm water or tea. This method is also recommended for children older than 1.
“You can use it with any kind of herbal tea or warm water with lemon juice, which can be soothing as well,” says Dr. Rainbolt.
So, how often can you use this home remedy? Dr. Rainbolt recommends using honey no more than four or five times a day.
And part of that reasoning is that honey does contain sugar.
“If you’re concerned about your sugar intake, then I recommend using honey more sparingly,” she says. “I would just use it at night to give you some relief before you go to bed.”
And can you use both honey and traditional cold medicine?
Yes, says Dr. Rainbolt.
“If it seems like the honey isn’t helping on its own, then you can certainly do both honey and medication, if medicine is something that you are able to take,” she notes.
Is honey safe to use?
Honey can be a helpful tool for those who can’t take traditional cold medications — for example, children under 6 years old or individuals with health conditions like high blood pressure or cardiovascular disease.
Overall, honey can be a good way to help soothe your sore throat and cough. It doesn’t come with some of the side effects that over-the-counter medications have like drowsiness.
So, can you just buy any honey you see on the grocery store shelf?
Yes, but you might want to make sure it’s been pasteurized. The pasteurization process removes any crystallization and unwanted yeast. It also improves honey’s texture and color, while extending its shelf life.
Dr. Rainbolt also mentions that some people think using local honey, which tends to be unpasteurized or raw, can come with extra benefits.
“There’s a thought that if you use local honey, you are exposed to some of the area’s natural allergens in a positive way,” she explains. “The idea is that it will help with allergies you have.”
The next time your throat starts to tickle, reach for honey and see if it helps.
“Think of honey as a first line of defense for those over 1 year old,” says Dr. Rainbolt. “Honey is something that pretty much everyone can try. And it’s been shown to work as well as some cough suppressant medications. It’s a nice alternative.”
Daily stressors can increase BP in the moment, as well as contribute to habits that can feed long-term hypertension
Feeling stressed? If so, you’re hardly alone, given that stress has been called the health epidemic of the 21st century. But have you ever wondered what all this stress means for your blood pressure?
The answer, it turns out, is more complex than you might think. Let’s take a closer look with preventive cardiologist Luke Laffin, MD.
Does stress raise blood pressure?
Stressful moments can totally send your blood pressure (BP) skyrocketing. You feel it deep in your core, too, as your heart thumps harder and your nerves jangle with a fight-or-flight response.
“If we’re in a stressful situation, the normal physiologic response is to increase blood pressure,” explains Dr. Laffin. “But your body can handle these sorts of acute changes in blood pressure pretty well.”
And once the immediate stressor is gone, your BP should return to its typical level.
Of course, not all stress clocks out like it’s a shift worker. Chronic stress tends to linger — and that can contribute to a long list of physical symptoms, including high blood pressure (hypertension).
The connection between stress and hypertension
Researchers don’t know as much about the direct effects of long-term stress on blood pressure. But they do know that stress can impact lifestyle habits and increase your risk of heart disease and other chronic health issues.
“Stress itself doesn’t necessarily cause sustained elevations in blood pressure,” says Dr. Laffin. “But it often has an impact on lifestyle factors, which can absolutely contribute to long-term elevations in blood pressure.”
When you’re chronically stressed, you can fall into habits that can lead to higher blood pressure and increase your risk of heart disease. These include:
It can be difficult to see when acute stress transitions to chronic stress. But seemingly “temporary” stressors that last for weeks can turn into chronic stressors that need to be addressed for the sake of your heart health.
“What we’re really worried about is chronically elevated blood pressure,” states Dr. Laffin.
Can lowering stress lower your BP?
Finding ways to better manage your stress can help keep your blood pressure from rising and staying at elevated levels, suggests Dr. Laffin. He suggests:
Focusing on fitness: “Working out regularly is a great way to feel better, decrease stress levels and better adapt to difficult situations,” says Dr. Laffin. The positive effects of exercise on heart health are also important for your blood pressure.
Catching ZZZs: The quantity and quality of your sleep matter for your BP. “For stable blood pressure, you need to get about six to eight hours of uninterrupted sleep at night,” he advises.
Minimizing stressors: To reduce stress, you need to address its causes. Of course, that can be easier said than done when stressors involve your job or family. In these cases, additional steps, like therapy, may help you find coping strategies.
Adopting a heart-healthy diet: Foods high in sodium and saturated fats can increase blood pressure even before you add stress to the mix. Embracing a Mediterranean-style diet and eating more antioxidant-rich foods can help keep your BP down.
Calming techniques: Various forms of meditation can help you calm your mind and tamp down stress. There’s evidence that mindfulness-based stress reduction can lower BP within a few months.
Medications like beta-blockers may also be an option if stress seems to be driving blood pressure into danger zones. Antihypertensives can help bring down high blood pressure, too.
“But managing stress-related hypertension usually comes down to lifestyle,” clarifies Dr. Laffin. “Diet, exercise, sleep — those are all factors that play a big role in keeping your heart healthy.”