
·
Tip of the day: Include the right food categories in your breakfast. A healthy, balanced breakfast includes lean protein, whole grains, and fruit. — #HarvardHealthTipoftheDay #HarvardHealth #HealthyBreakfast #Breakfast

Health is Wealth
·
Tip of the day: Include the right food categories in your breakfast. A healthy, balanced breakfast includes lean protein, whole grains, and fruit. — #HarvardHealthTipoftheDay #HarvardHealth #HealthyBreakfast #Breakfast


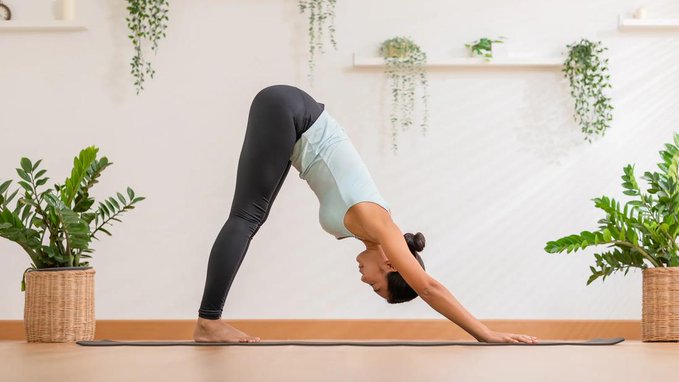
Take a ‘Paws’ With Downward Dog
This transitional and restorative yoga pose provides a full-body stretch
Physical therapist Dawn Lorring, PT, MPT, walks through the steps of how to do downward dog correctly and shares its many benefits.
From beginner’s yoga to more advanced practices, downward dog is one of the most popular poses…with a few common misconceptions.
Rounding your back, placing your feet too far apart or putting too much weight into your wrists can all create a deeper stretch than intended — which increases your risk of injury.
Physical therapist Dawn Lorring, PT, MPT, walks through the steps of how to do downward dog correctly and shares its many benefits.
Downward dog (also known as downward facing dog, facing dog pose or Adho Mukha Svanasana in Sanskrit) is a foundational yoga pose. It’s often used as a transition between movements, like sun salutations. It’s also a form of active resting, active stretching and strengthening. This allows you to check in with yourself and re-evaluate your intentions during your practice.
You do downward facing dog by putting your body into an inverted V-shape (or pyramid), as if there were a straight line that runs through the top of your head up your spine and out of your butt toward the ceiling.
Facing dog pose won’t usually be your first movement when doing yoga. Before trying it, it’s best to loosen up your muscles and joints and find ways to work it into your overall yoga practice.
Once you’re warmed up and ready to go, follow these steps:
“Downward facing dog isn’t about keeping your heels on the ground or holding it for long periods of time,” clarifies Lorring. “It’s really about making sure you’re going to a place that’s comfortable for you, so you can adjust your body as often as you need in this pose.”
If you have a hard time getting down on your hands and knees, try this wall variation:
For a more challenging stretch that deeply engages your hips and hamstrings:
Downward facing dog provides a full body stretch, while also strengthening and working your:
Adho Mukha Svanasana helps improve your flexibility and control, and provides you a moment of active rest. It also increases blood flow to your head and upper body when you’re in the inverted V position. But because of this, you should talk to your yoga instructor, athletic trainer or healthcare provider before starting this position if you have:
“Facing dog pose tries to improve flexibility but also builds the strength to control that flexibility,” says Lorring. “If you’re feeling excessive stress to a certain part of your body, then you’re probably holding the pose for too long or you’re trying to go into a range that you’re not ready for. We can help you get there.”

If you run regularly, whether it’s an easy jog around the block to stay fit or an intense training regimen to prepare for a marathon, you need proper nutrition.
Here are some tips to help keep runners well-nourished and ready to win.
A good diet can boost your physical health and help you meet your fitness goals. Make sure your meals emphasize the following basic components:
Individuals may have different optimal balances, but in general, people who include running or jogging as part of their fitness regimen should get 60% to 70% of their calories from carbohydrates, with lean protein and healthy fats each accounting for 15% to 20% of their remaining calories.
Although low carbohydrate diets are popular go-to’s for people wanting to lose weight, they’re not ideal for distance runners, who thrive on carbohydrates for endurance.
That is why very low carbohydrate diets, such as the ketogenic diet, plus running is not a good idea. Experts do not recommend keto to runners unless they have been told by their doctor that this a medically safe option for them and they are being monitored while in ketosis.
Distance runners need more carbs than people who aren’t training. Undereating carbohydrates can be hard on your body and affect your recovery after your run.
Here’s why: Running uses both glucose in the blood and your stores of glycogen. Glucose is the form of sugar that circulates in the bloodstream, and glycogen is the sugar stored in your liver and muscles that acts as the primary fuel for endurance exercise.
Eating plenty of carbs helps ensure that these energy stores are ready to support your training. When those stores get too low, runners are more likely to run out of energy and “burn out” or “hit a wall” while training.
Running changes your body and your nutritional needs. Often when people start a running regimen, they are trying to lose weight or get in shape quickly, and they don’t realize they need to adjust their diet.
Especially in women runners, dietitians report seeing a tendency to overdo the running while not eating enough, and this can have an effect on health if they do not adequately replenish lost vitamins and minerals in their diet.
For women in particular, calcium and vitamin D are essential for bone health to avoid loss of bone mineral density and the risk of stress fractures.
For more vitamin D, include these foods in your meals:
For more calcium, try:
Iron deficiency can affect women and even have an impact on their running performance. Menstruation puts people at higher risk of iron deficiency, and if iron isn’t replenished in the diet, decreases in hemoglobin can occur and bring on anemia. Hemoglobin is what carries oxygen throughout the body, including the muscles, so if there is a deficit, the muscles may feel the effect of insufficient oxygen during exercise.
Iron-rich foods include:
Dietitians recommend eating eating iron rich foods in combination with foods high in vitamin C, such as citrus, bell peppers or berries, since vitamin C helps increase the body’s absorption of iron.
The best time to eat a full meal is about two to three hours before you hit the road, track or trail. Have a good source of carbs paired with protein, making sure the meal focuses on a healthy carb source.
If it’s been more than three to four hours since you’ve eaten, a carbohydrate-rich snack a half-hour before running can ensure you have adequate glucose available before you head out. Directly before a run, it’s best to stick with easy-to-digest carbohydrates to avoid gastrointestinal [GI] distress such as cramping or diarrhea.
Try these:
If you are training for a marathon or distance event and are going to be out for over an hour, you will want to bring some fuel with you. Energy drinks, gel tubes and other sources of quick blood-glucose boosters are available, but you can also use something as simple as fruit snacks.
Try practicing with these items as you train so you can pick the formulas that are best for you, and you can work on accessing and ingesting them smoothly without breaking stride.
Before a run or the night before a big race, Eidel recommends going easy on:
It might. Carb loading is the practice of eating a lot of carbohydrates ― particularly those that are easily absorbed, such as white bread, pasta and rice ― for 24 to 48 hours before a big race or distance run, to shore up your body’s stores of glycogen and lessen the risk of burnout before finishing the event.
Some studies show carb loading is beneficial for people preparing for a race, but it’s important to make sure during that time you’re also allowing your body to rest and giving it time to store what you are ingesting. The number of carbohydrate grams will be differ from person to person, but in general, evidence shows carb loading can be beneficial prior to a distance event.
In contrast, casual runners likely do not need to carb load. Ensuring that their day-to-day diets include extra carbohydrates can be sufficient.
It’s common for people not to feel hungry after a run, but a snack or light meal of complex carbohydrates and protein within the first hour after running can help replenish glycogen stores and to support recovery and rebuild stressed muscles. For example:
If you’re interested in running as part of a weight loss plan, getting adequate nutrition is a must. Even casual running or jogging burns calories and can be hard on the body. Runners can become undernourished at first because they don’t understand how much energy they’re burning when they run and what they need to properly recover.
Eating enough is also essential to building muscles, which can aid in fat burning ― a plus for people working on achieving or maintaining a healthy weight.
For optimal weight loss, your plan should not rely on running alone but also include strength training and proper nutrition.
If you run regularly, you should pay attention to the effects of what you eat and when, especially on running performance. Learning what works best for you can take some time and a little trial and error, but it is worth it, since running, jogging and other regular aerobic exercise offers so many health advantages.
Always feel free to consult a dietitian or doctor, and listen to your body if you’re not keeping up with your training goals.

There is something special about using fresh peas straight out of the pod. This recipe was inspired by our root-to-stem philosophy of cooking: It always seems like such a waste to throw away the pea pods, but they are relatively inedible. To make use of the pods, we’ve pureed them into a spring-fresh pasta sauce. Remember: Pasta for breakfast is a great choice, especially when it’s loaded with healthful pea protein.
Kosher salt
1 pound fresh English peas in pods (yields about 1 cup shelled peas and about 3 ½ cups pods)
½ cup water
¼ cup extra-virgin olive oil
2 small spring onions or 2 large shallots, chopped
2 small spring garlic (whites) or 3 garlic cloves, minced
2 tablespoons Greek yogurt (optional)
12 ounces whole grain pasta, such as linguine, rigatoni or small shells
Freshly ground black pepper
¼ cup fresh mint (peppermint preferred), thinly sliced
Espelette pepper to taste (optional)
Grated Parmigiano Reggiano cheese (optional)
Makes 4 servings.
Calories: 554 kcal
Total fiber: 12 g
Soluble fiber: 0.1 g
Protein: 15.5 g
Total fat: 16.7 g
Saturated fat: 2.0 g
Healthy fats: 12.1 g
Carbohydrates: 84 g
Sugars: 7.7 g
Added sugars: 0 g
Sodium: 178 mg
Potassium: 433 mg
Magnesium: 14 mg
Calcium: 134 mg
Source: The What to Eat When Cookbook by Michael F. Roizen, MD, Michael Crupain, MD, MPH and Jim Perko, Sr, CEC, AAC.

Mayo Clinic Sports @mayoclinicsport 14 hours ago
Sitting vs. Standing DYK that more standing and less sitting can help you lose weight, increase productivity, and lower risk of heart disease. Take a stand for health and success today! Learn more  https://mayocl.in/2Mbvqnm

