This is a last-minute dessert that can be made post-dinner, while you brew the coffee and finish clearing the table. Have ingredients and equipment ready beforehand — just be sure to turn the pineapple once and give the skillet a couple of shakes and voila! You’ll have a delightfully sweet dessert ready at your fingertips.
Ingredients
1/4 cup sugar 1/4 cup sugar substitute 1 pineapple, peeled, cored and sliced into six wedges lengthwise Butter-flavored cooking spray, refrigerated 1 tablespoon trans-fat free margarine 2 tablespoons Cognac or fresh orange juice 1 cup fresh raspberries
Directions
Combine the sugar and sugar substitute. Sprinkle half of the mixture over one side of the pineapple. Turn and sprinkle the rest on the other side.
Lightly coat a large non-stick skillet with cooking spray. Add the margarine and melt over high heat. Place the pineapple in the skillet and cook, turning once and shaking the pan often, until it turns golden brown, 10 to 15 minutes. (The pineapple can be prepared to this point and held for one hour.)
Transfer the pineapple wedges to six dessert dishes, leaving the sauce that has formed in the pan.
Stir the cognac into the pan to thin the sauce. Heat briefly. Drizzle the sauce over the pineapple and sprinkle with equal portions of the raspberries. Serve warm.
Nutritional information (per serving)
Makes 6 servings
Calories: 118 Total fat: 3 g Protein: 0.1 g Carbohydrate: 22 g Dietary fiber: 2 g Cholesterol: 0 mg Sodium: 0 mg Potassium: 122 mg
How Long To Breastfeed: What the Guidelines Say and What To Consider
Recommendations encourage breast milk exclusively for baby’s first six months and continuing to provide human milk until age 2 and beyond
How and what you feed your baby is probably one of the most basic — and yet deeply personal — decisions you’ll face when you become a parent.
You’ll hear things like “breast is best.” As in, breastfeeding (chestfeeding) is the absolute best way to nourish your baby.
And then you’ll hear the retort, “fed is best.” Meaning breast milk (human milk) and formula are both fine. As long as your baby is getting nutrients in their belly, all is well.
Then come the opinions on how long you should breastfeed. (You’re still breastfeeding? You gave up on nursing already? You fed your baby formula?)
It can feel like there’s no right way to do it. And there’s some truth to that.
Because what works for one family may not be feasible for another. But that’s OK.
Breast milk can provide certain benefits that formula can’t mimic. But breastfeeding, especially for long periods of time, might not work for everyone. Or you may have been given the impression that you’ve continued providing human milk long after others think you “should.”
No one should feel guilt, shame or otherwise crummy about how they feed their baby. Let’s face it, mom guilt is tough enough as it is.
So, we talked with board-certified breastfeeding medicine physician Heidi Szugye, DO, about breastfeeding recommendations.
How long to breastfeed
Science shows that if you can give your baby human milk (either your own or a donor’s), it has its benefits. And the longer, the better, experts recommend.
12 months to 24 months (and beyond): Mostly solid foods with some human milk, as mutually desired by parent and child.
Previous recommendations called for providing breast milk until age 1. But these newer guidelines (implemented in 2022) are based on the understanding that human milk has benefits that continue long after baby’s first birthday. And they help to remove stigmas associated with people who choose to extend breastfeeding into toddlerhood.
“These recommendations are a call to action for everyone, and that includes hospitals, pediatricians and all physicians that are taking care of families,” Dr. Szugye states. “We want to make sure our practices and policies are set up to support people who choose to breastfeed beyond the first year of their child’s life.”
Think of the guidelines as the best-case scenario. If it works for you, your family, your child, your body and your life to breastfeed for two years or longer, you’re doing a great thing. And there’s no reason to stop until you and your child are ready.
If it doesn’t work for you, that’s OK, too. Your worth as a parent and your love for your child can’t be measured in ounces of milk.
Benefits of extended breastfeeding
The recommendations are based on research showing that human milk has some big benefits. And those perks continue for as long as you continue to supply it.
“Breastfeeding offers tremendous benefits — from custom-made nutrition and increased immunity to protecting you against some forms of cancer. And those benefits don’t go away as your baby ages,” Dr. Szugye shares. “We have more and more data supporting that there are benefits to breastfeeding for more than one year when possible.”
Breastfeeding can offer both you and your baby some big benefits:
Benefits for lactating parents
Benefits for baby
Lower risk of developing conditions like Type 2 diabetes, high blood pressure, cardiovascular disease, breast cancer and ovarian cancer.
Decreased risk for ear infections, respiratory infections, gastrointestinal illnesses, SIDS, leukemia, diabetes, obesity, asthma and eczema.
“There are a lot of immunologic factors and components to human milk,” Dr. Szugye says. “One big advantage to human milk is that you pass antibodies to the baby. So, if you’re exposed to a respiratory illness or GI illness, those antibodies are passed on to the baby and then that makes them less likely to get sick. And if they do get sick, it’s less severe. It’s almost like a built-in immunity.”
Keeping up milk supply for the long haul
Some people can make enough milk to breastfeed for as long as they and their babies choose. But some don’t. At least not without taking some steps to keep it up.
If you suspect your supply is dwindling as your child gets older, there are ways to help promote more milk production if you want.
“Many people notice their supply drop and mistakenly assume it won’t return,” Dr. Szugye notes. “But if you want to continue to breastfeed, there are options that could help.”
If a supply boost is in order, you can try:
Nursing more often — Add sessions as long as your child will nurse. If you’re away from them during the day, try early evenings, mornings or weekends.
Pumping strategies — An extra session or several short “power pumping” sessions (think five to 10 minutes throughout the day) for several days in a row can trigger your body to make more milk.
Breast massage and compression — Easy-to-learn techniques can improve drainage when nursing or pumping.
Take care of yourself — Reduce stress, rest when possible, hydrate and eat a balanced diet with an extra 500 calories a day to support breastfeeding.
Not an ‘all-or-nothing’
If two or more years of breastfeeding seems daunting, remember that you have options.
For starters, giving your child human milk doesn’t always mean latching them to your breast and nursing. That’s just one way to do it. Pumping milk and putting it in a bottle, cup or spoon are also options.
And you may find that a donor bank could be a route to explore if you don’t lactate or if you have concerns about a low milk supply. Donor milk is pasteurized, screened for drugs, medications and infections, and tested for bacterial contamination before it’s stored and made available for purchase.
“Reach out to your pediatrician or women’s healthcare provider if you’re interested in obtaining donor milk. You may need a prescription from a healthcare provider,” Dr. Szugye suggests.
Remember, too, that any amount of human milk can be a benefit. If keeping up with your baby’s breastfeeding demands becomes too high a burden, there are alternatives.
Some parents may find that supplementing with formula (or other foods and milk after baby turns 1) can help give your child some human milk, while keeping up with their nutritional needs — and not burning yourself out in the process.
“It’s not an all-or-nothing thing,” Dr. Szugye reassures. “Any amount of human milk you can give is a benefit. If it doesn’t work for you to constantly supply human milk, that’s OK. We’re all just doing our best.”
If breastfeeding is going well for both you and your child, there’s no reason to give it up until you’re both ready to.
Feeding a baby is tough work, no matter how you do it. And chances are, you’re doing a fantastic job.
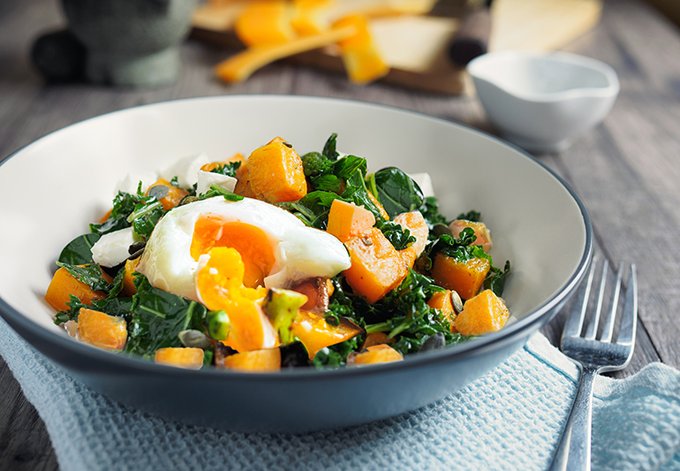
Fuel up with protein and healthy fats for breakfast!
A meal that’s heavy in sugar and starch is no way to start your day – especially if you’re following the ketogenic diet.
These recipes from functional medicine specialist Mark Hyman, MD, are a great way for anyone — keto or not — to bring real, whole, fresh foods (including non-starchy vegetables) to your plate first thing in the morning.
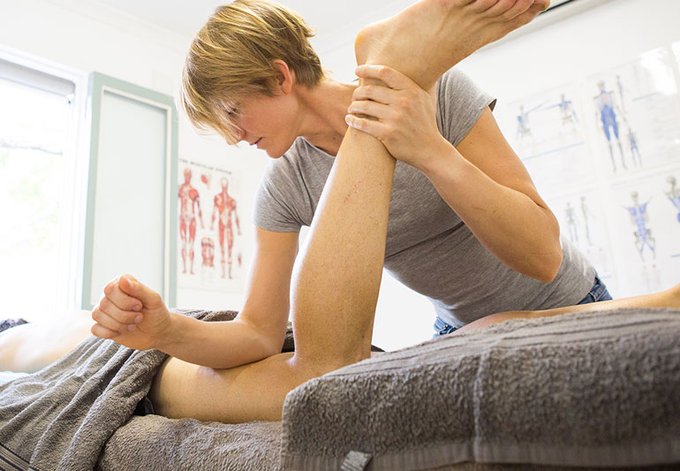
If you’re stressed and sore, you may think there’s nothing you can do but take some over-the-counter pain relievers and plow through your day. But licensed massage therapist, Victoria Bodner, LMT, says you don’t have to grin and bear it.
Massage is a great tool for relaxation, pain relief, easing muscle tension and more, says Bodner. Learn more about the common types of massage and their benefits.
What is massage therapy?
Performed by a licensed massage therapist, massage therapy involves using different pressures, movements and techniques to manipulate muscles and other soft tissues in the body. With a goal of slowing down your nervous system, massage therapy can be used to release stress and tension, provide relief from symptoms, heal injuries and support wellness.
Types of massage therapy
Massages come in all shapes and sizes. Here are some of the offerings you might find on a massage therapy menu.
Swedish massage
Feeling stressed? A Swedish massage is the classic go-to for major relaxation. Swedish massage is typically a full-body massage that uses a gentle touch. It’s a good pick for people new to massages. “It can help calm your nervous system. Swedish massage is also a good avenue for encouraging a relaxed emotional state of mind which can directly impact your muscles,” says Bodner.
Deep tissue massage
Your muscles can get tight from repeated use — even from something less active like sitting, driving or hunching over your laptop. “Deep tissue massage gets into your muscles and tendons to release that tightness,” Bodner says. It’s good for people with injuries, general muscle tightness and chronic muscle pain.
Sports massage
Sports massages are similar to deep-tissue massages, but they zero in on the muscles that take a beating when you play sports or do another repetitive physical activity. “Athletes and dancers use their bodies differently than the average person,” Bodner says. “A massage therapist with experience in sports massage can get in there to break up muscle tightness and address sports injuries.”
Trigger point massage
A knot in your neck or a tight spot in your back is known as a trigger point. “A trigger point is a tiny muscle spasm or tight spot in the tissue,” Bodner explains. In a trigger-point massage, the massage therapist uses focused and direct pressure to target those spots. This increases blood flow to the areas, helping them release. This type of massage can also be helpful for people with chronic pain.
Myofascial release
The fascia is a web of connective tissue under the skin. “It supports the muscles and allows us to move freely,” Bodner explains. When you get a myofascial release, your massage therapist will knead and stretch the muscles and fascia to work out tension and tightness. “It’s a form of deep stretching often used together with other therapeutic massage techniques,” she says. “It’s great for opening up tightness in your neck, shoulders and your upper and lower back.”
Lymphatic massage
Lymphatic fluid has several important functions, including maintaining fluid levels and removing waste products from the body. Lymphatic massage uses a gentle touch to help lymphatic fluid flow more freely through the body. “Lymphatic massage is great for people with inflammation — including people with illnesses like arthritis, as well as people who have had mastectomies, which often involve removing the lymph nodes,” Bodner says.
Prenatal massage
Prenatal massages are great for helping moms-to-be relax and can help address the aches and pains of growing a baby. “Prenatal massages are wonderful for taking pressure off the hips and can help with swelling in the feet and legs,” Bodner says. “And when mom is relaxed and feeling well, the baby benefits, too.”
Health benefits of massage
Massage therapy may be beneficial for anyone but has been noted to help those who various conditions like cancer, heart disease, stomach problems and fibromyalgia. You should make sure you talk to your therapist about any medical issues prior to your first session. Here are some of the benefits of massage therapy.
Reduces stress and anxiety
That feeling of calm after a massage can aid in reducing stress and anxiety, a study found. Your body has two nervous systems: a sympathetic nervous system that drives your “fight or flight” response in stressful situations and a parasympathetic nervous system that focuses on routine and day-to-day operations that lead to relaxation and rest. A massage is thought to increase your parasympathetic response, which can decrease feelings of anxiety.
Improves sleep
Getting a massage can decrease cortisol (a stress hormone) and increase levels of serotonin and dopamine, neurotransmitters known to stabilize your mood. Studies have shown that massage therapy is beneficial for those who have insomnia related to menopause and congestive heart failure.
Lessens pain and muscle tension
A variety of studies have looked into how massage may help lessen pain like acute back pain, neck pain, headaches and knee pain. The results show that relief may be short-term, rather than long-term and in some cases receiving a 60-minute massage multiple times per week had better results than fewer or shorter massages.
Improves immune function
Can a massage boost your immune system? A study suggests that regular massages increase your body’s level of white blood cells, which work to combat viruses.
Relieves constipation
A study shows that for those dealing with constipation after surgery, an abdominal massage may help with bowel movements.
Lessens fibromyalgia symptoms
From sleep, memory and mood, studies have shown that using massage over the course of five weeks may improve symptoms of fibromyalgia, a chronic illness that causes muscle and joint pain and fatigue.
Relieves cancer pain
For people undergoing cancer treatments, the physical and emotional toll is great. Many have turned to massage to help lessen cancer pain, increase relaxation and improve quality of life. There have been a variety of studies, some that say massage therapy doesn’t improve cancer pain and others that show a positive impact.
Who should try massage therapy?
Many of us can benefit from a massage — it’s a great way to improve wellness, help with pain and more. If you have a medical condition, you should check with your doctor and have a conversation with your massage therapist. For those who are pregnant, a prenatal massage can help alleviate pain and swelling.
“There are so many good reasons to see a massage therapist,” Bodner says.
Not sure what type of massage is right for you? You don’t have to zero in on the perfect massage before booking an appointment. In fact, massage therapists often mix and match techniques to address your unique concerns.
“The different types of massage aren’t exclusive from one another,” Bodner says. “A massage therapist uses a combination of techniques to help you relax, get rid of tight muscles and address other concerns.”
Muscles in your body are a use-or-lose proposition. You need to use them to keep them strong!
You may not realize it, but we all start losing 1 percent of muscle mass each year after age 30. That’s why your diet in later years should not look the same as it did when you were younger, says endocrinologist Susan Williams, MD.
Skipping breakfast, eating fast food and being inactive in your 20s and early 30s might not hurt your health in the short term. However, poor nutrition and lifestyle habits take their toll over time.
People who embrace good habits early on really get ahead of the game, Dr. Williams says. But it’s never too late to start eating better and taking better care of your body.
Whether you’re 30 or 50, Dr. Williams offers three important tips to get started in eating right when you are thinking about your long-term health.
A roller coaster of weight gain and loss can change your body composition and leave you with more fat mass and less lean muscle mass.
2. Eat three balanced meals a day
You also want to limit your snacks in between. The word “balanced” is especially important because eating a wide variety of foods will help you prevent nutritional deficiencies.
Dr. Williams suggests this simple shopping list:
Lean proteins. Choose chicken, white fish, oily fish like salmon, eggs, tuna fish and red meat (less frequently than other protein).
Whole grains. This includes multigrain breads, and long-cooking rice or oats.
Veggies. Go for fresh or fresh frozen. Choose what’s in season and enjoy a variety to get the vitamins and minerals your body needs.
Fruit. Fresh fruit is best, followed by frozen. Canned fruit can be OK, but choose options in light syrup or water. Check the label and avoid added sugar.
Dairy. Choose milk, yogurts, cheeses and cottage cheese that are low-fat or fat-free.
Steer clear of cookies, cakes, pies, ice creams, juices and rich desserts. If that sounds like no fun, Dr. Williams advises treating these foods as treats. Save them for dining out or special occasions, but don’t make them part of your daily diet.
Eating protein and being physically active are equal partners in the quest for maximum health, Dr. Williams says. Muscles are made of protein, but simply eating protein is not enough to save them.
“Muscles in your body are a use-or-lose proposition,” she says. “You need to use them to keep them strong.”
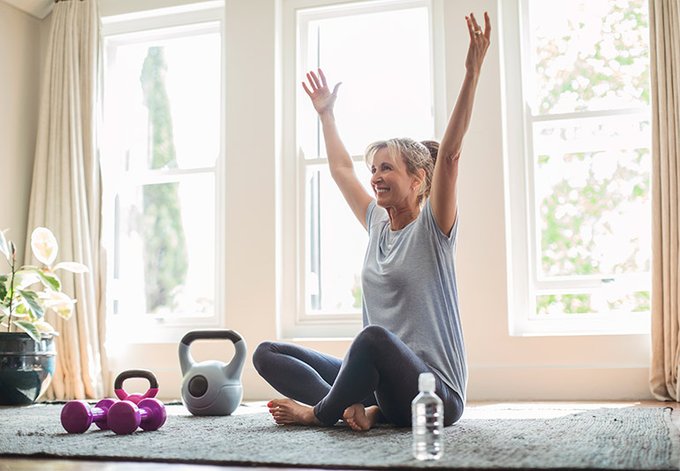
Can’t carve out time for the gym? Try this daily routine:
After dinner, spend 10 minutes with stretch bands or light weights.
Even a half hour of physical activity can make a world of difference, especially if you make it a habit in your 30s. “Don’t let your weight creep up while your muscle mass creeps down over your 30s and 40s,” Dr. Williams says. The longer you wait, the harder it will be to get started — and the more muscle you will have already lost.
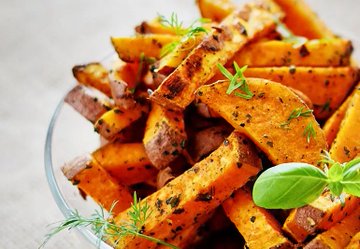
Swap regular fries for these delicious, and nutritious, potato wedges
These crispy sweet potato wedges come out Cajun spicy and sweet. Don’t tell anyone but they’re also really healthy. They’re loaded with antioxidants and phytonutrients and are a great source of beta-carotene. Another plus? As complex carbs, they digest slowly and raise blood sugars gradually — keeping you from a spike and drop-off.
Ingredients
2 sweet potatoes, cut into wedges (about 8 wedges per potato)
1 tablespoon olive oil
2 tablespoons Cajun seasoning
Directions
Preheat oven to 425 F.
In a large mixing bowl, combine the sweet potatoes, oil and Cajun seasoning. Mix well to evenly coat wedges.
Spread the wedges in a single layer on one (or two, if needed) ungreased baking sheets.
Bake for 30 minutes or until crispy and brown on one side.
Flip fries over and bake for another 30 minutes or until the wedges are crispy on the outside and tender inside.
Ingredient health benefits
Sweet potatoes: These root veggies are beloved the world over for their flavor and versatility. But did you know there’s more to sweet potatoes than … well, just being sweet? They’re also packed with essential vitamins and minerals like vitamin B6, vitamin C, vitamin A and potassium. These nutrients help support many aspects of your overall health, including your immune system, metabolism, blood pressure and vision. Sweet potatoes also have carbohydrates and fiber to fuel your cells and promote healthy digestion.
Olive oil: This cooking oil is one of those ingredients that’s actually worth the hype. Olive oil is full of unsaturated fats and polyphenols. These compounds support your heart and fight inflammation that can harm your cells. Vitamin E and vitamin K, also known as fat-soluble vitamins, maintain radiant skin and strong bones. Olive oil also elevates your good “HDL” cholesterol while lowering your “bad” (LDL) cholesterol. And powerful antioxidants suppress free radicals, damaging little particles that harm your cells in ways that can lead to cancer. While all olive oil has these benefits, extra virgin olive oil (EVOO) is the highest quality, so don’t hesitate to pick some up if it fits within your budget!
Go inside the operating room for open-heart surgery. Dr. Eric Roselli gives us a behind-the-scenes look at a complex procedure. pic.twitter.com/YAqVrVclyQ
Only 130 calories per serving, this dessert deserves your attention
These delicious chocolate soufflés are perfect to share with someone you love. With rich chocolate flavor, strawberries, cinnamon and even a little Cognac, they’re only 130 calories per serving.
Ingredients
1 1/2 teaspoons oil-based butter spread
1/4 cup plus 1 teaspoon sugar
1 tablespoon ground toasted almonds
3 tablespoons plus 1 teaspoon good-quality cocoa
4 large egg whites, at room temperature
1 tablespoon Cognac
1/2 teaspoon ground cinnamon
1 teaspoon confectioners’ sugar
12 strawberries, thinly sliced
Directions
Preheat the oven to 375 F. Grease/flour 6-ounce soufflé cups with the butter spread.
Mix 1 teaspoon of the sugar with the almonds and 1 teaspoon of the cocoa. Coat the insides and bottom of the soufflé cups, tapping the sides to make sure they’re coated.
Heat 2 tablespoons water with the remaining sugar in a nonstick small pot. Bring to a simmer and cook until the mixture becomes thick, about 3 minutes. Don’t allow the syrup to color. Brush down the sugar crystals on the sides of the pot with a wet pastry brush as the syrup thickens. It will be quite hot so be careful.
While the sugar and water are simmering, beat the egg whites until stiff in the bowl of an electric mixer. While continuing to beat, slowly and carefully pour the hot sugar syrup into the egg whites. Add the 3 tablespoons cocoa, the Cognac and cinnamon.
Spoon the mixture into the soufflé cups, tapping each cup to make sure there aren’t any bubbles. Bake for 10 minutes, or until the soufflés are puffed and set. Immediately place the soufflés on dessert plates. Sift the confectioners’ sugar over the tops and decorate each plate with 3 strawberries. Serve immediately.
You know exercise builds muscles, strengthens bones, keeps your heart healthy and your mind sharp. But it also does something that you might not think much about: It helps keep your immune system — your internal defenses against infection — in tip-top shape.
If you take time for some physical exertion each day, it helps get your body ready to attack bacteria, viruses and toxins that can sneak in and make you sick.
But how much exercise is effective? Do too little or too much, and it won’t have the best effect on your immune system.
Clinical immunologist Leonard Calabrese, DO, answers common questions about how exercise can impact your immunity and how to use your workouts to shut out a world of would-be invaders.
Q: How does breaking a sweat boost immunity?
A: If you exercise moderately on a regular basis, it tunes up the immune system in many ways. It enhances your broad-based defenses against viral infections, such as those causing upper respiratory infections.
Working out regularly also reduces the risk of many chronic diseases such as cardiovascular, respiratory illnesses and metabolic diseases, such as type 2 diabetes.
Q: How much exercise do you need?
A: Fortunately, you don’t have to push yourself to the limit to rev up your immune system. In fact, your immune system needs less of a workout than you get with your average cardio routine.
Focus on getting 20-30 minutes of moderate exercise, five days a week, and your immune system will thank you.
Q: What types of exercise are most helpful?
A: Moderate exercises, including biking or walking briskly in your neighborhood, are good ways to get your blood flowing. Swimming is also a good option for non-weight-bearing exercise for your joints.
Also try mind-body exercises such as Tai-Chi, Qi Gong and yoga, which are all options that help keep your joints flexible. These exercises also reduce chronic stress, which in itself is a powerful immune booster. These exercises can also help alleviate osteoarthritis and fibromyalgia symptoms.
Q: Can too much exercise set your immune system back?
A: Yes, though, the level to which it can slow your system down is still up for debate.
Research shows that exercising for more than 1.5 hours without refueling your body or giving it enough time to recover suppresses your immune responses for up to a few days. During that time, your cortisol levels rise, your white blood cell count drops and you’re more likely to develop a respiratory infection.
This problem usually affects elite athletes, such as marathon runners, most.
On the flip side, staying sedentary also increases your risk of infection, inflammation and chronic disease.
Q: Can exercise make an illness worse?
A: Yes, it can. This is a complex issue, but I like to tell my patients to do a “neck check.” If your symptoms are mostly of a mild cold without fever or lower respiratory symptoms, such as a productive cough, wheezing or shortness of breath, mild exercise can actually reduce congestion and may make you feel better.
If your symptoms are primarily in your lungs or you have a significant fever its better to rest until things settle down. Regardless, good hydration is important.
You’re taking cough syrup and lozenges in an attempt to get some relief. But what about using honey for sore throat symptoms? Does this natural home remedy actually work to soothe a sore throat and cough?
In addition to having other symptoms like nasal congestion, fatigue and fever, you may develop a cough.
Honey has a long history of being used as a natural remedy. And one remedy is to soothe sore throats and help alleviate a cough.
“Research shows that honey has some antimicrobial and anti-inflammation properties. Honey can help by decreasing inflammation and irritation in your throat,” explains Dr. Rainbolt. “Another study shows that honey may reduce mucus secretion. So, you can use honey for cough symptoms as well, whether it’s a wet or dry cough.”
Is it safe for children?
Giving honey to a child under 1-year-old isn’t recommended, warns Dr. Rainbolt.
“There’s concern for an infant botulism, a serious illness that’s caused by Clostridium botulinum,” she continues. “While it’s a rare occurrence, honey can contain spores that cause botulism. It attacks the body’s nervous system and children under one are more vulnerable.”
How to use for a sore throat
Most sore throats tend to get better within a week, but during that time, adults can take a spoonful (about 1 teaspoon) of honey for a cough and sore throat.
You can also dilute half a teaspoon to 1 teaspoon of honey in warm water or tea. This method is also recommended for children older than 1.
“You can use it with any kind of herbal tea or warm water with lemon juice, which can be soothing as well,” says Dr. Rainbolt.
So, how often can you use this home remedy? Dr. Rainbolt recommends using honey no more than four or five times a day.
And part of that reasoning is that honey does contain sugar.
“If you’re concerned about your sugar intake, then I recommend using honey more sparingly,” she says. “I would just use it at night to give you some relief before you go to bed.”
And can you use both honey and traditional cold medicine?
Yes, says Dr. Rainbolt.
“If it seems like the honey isn’t helping on its own, then you can certainly do both honey and medication, if medicine is something that you are able to take,” she notes.
Is honey safe to use?
Honey can be a helpful tool for those who can’t take traditional cold medications — for example, children under 6 years old or individuals with health conditions like high blood pressure or cardiovascular disease.
Overall, honey can be a good way to help soothe your sore throat and cough. It doesn’t come with some of the side effects that over-the-counter medications have like drowsiness.
So, can you just buy any honey you see on the grocery store shelf?
Yes, but you might want to make sure it’s been pasteurized. The pasteurization process removes any crystallization and unwanted yeast. It also improves honey’s texture and color, while extending its shelf life.
Dr. Rainbolt also mentions that some people think using local honey, which tends to be unpasteurized or raw, can come with extra benefits.
“There’s a thought that if you use local honey, you are exposed to some of the area’s natural allergens in a positive way,” she explains. “The idea is that it will help with allergies you have.”
The next time your throat starts to tickle, reach for honey and see if it helps.
“Think of honey as a first line of defense for those over 1 year old,” says Dr. Rainbolt. “Honey is something that pretty much everyone can try. And it’s been shown to work as well as some cough suppressant medications. It’s a nice alternative.”