From beginner’s yoga to more advanced practices, downward dog is one of the most popular poses. Physical therapist Dawn Lorring, PT, MPT @ClevelandClinic

Take a ‘Paws’ With Downward Dog

This transitional and restorative yoga pose provides a full-body stretch

Physical therapist Dawn Lorring, PT, MPT, walks through the steps of how to do downward dog correctly and shares its many benefits.

From beginner’s yoga to more advanced practices, downward dog is one of the most popular poses…with a few common misconceptions.

Rounding your back, placing your feet too far apart or putting too much weight into your wrists can all create a deeper stretch than intended — which increases your risk of injury.

Physical therapist Dawn Lorring, PT, MPT, walks through the steps of how to do downward dog correctly and shares its many benefits.

What is downward dog?

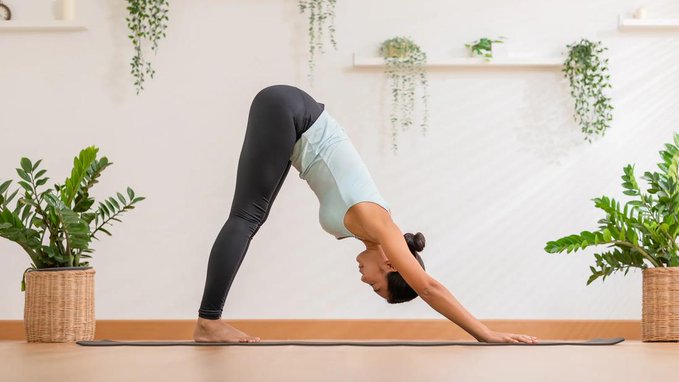
Downward dog (also known as downward facing dog, facing dog pose or Adho Mukha Svanasana in Sanskrit) is a foundational yoga pose. It’s often used as a transition between movements, like sun salutations. It’s also a form of active resting, active stretching and strengthening. This allows you to check in with yourself and re-evaluate your intentions during your practice.

You do downward facing dog by putting your body into an inverted V-shape (or pyramid), as if there were a straight line that runs through the top of your head up your spine and out of your butt toward the ceiling.

How to properly do downward facing dog

Facing dog pose won’t usually be your first movement when doing yoga. Before trying it, it’s best to loosen up your muscles and joints and find ways to work it into your overall yoga practice.

Once you’re warmed up and ready to go, follow these steps:

  1. Start on all fours with your hands shoulder-width apart and your knees in line directly behind your hips.
  2. Spreading your fingers wide, press down into your hands and tuck your toes (almost like you’re using them to grip the floor beneath you).
  3. As you exhale, bring your hips up and back, as if there’s a string pulling your butt toward the ceiling, so your body creates an inverted V-shape (or pyramid).
  4. Focus on straightening your back, not rounding it, so your head and neck are relaxed between your upper arms. It helps to focus on pressing through your arms to “push” the ground away from you and keep your arms active.
  5. Engage your core muscles and pull your tummy in.
  6. Keep your legs straight and, if it’s comfortable for you to do so, try to drop your heels down to the floor.
  7. Adjust your posture by shifting your weight between your hands and feet until you sink comfortably into the position.
  8. Hold this pose for 10 to 15 seconds at a time, making sure to breathe throughout.
  9. For a more relaxed stretch, bend your knees a little and readjust your posture as needed.
  10. When you’re done, exhale and move into your next pose or slowly lower yourself to the floor to enter child’s pose.

“Downward facing dog isn’t about keeping your heels on the ground or holding it for long periods of time,” clarifies Lorring. “It’s really about making sure you’re going to a place that’s comfortable for you, so you can adjust your body as often as you need in this pose.”

Facing dog pose variations

If you have a hard time getting down on your hands and knees, try this wall variation:

  1. Face the wall and place both your hands out in front of you so your palms are flat and your fingers are stretched out.
  2. Keeping your head and back straight and your hands on the wall in front of you, slowly walk your legs backward.
  3. As you move, walk your hands down the wall so you hinge at your hips and look directly at the floor.
  4. Keeping your head and neck relaxed, hold this pose for 10 to 15 seconds before slowly returning to stand.
  5. If you feel stress or discomfort in your wrists, you can modify by rolling up a towel or the edge of your yoga mat and placing the roll under the heels of your hands. This will decrease some of that pressure.

For a more challenging stretch that deeply engages your hips and hamstrings:

  1. While in the downward facing dog position, lift one leg up and stretch it toward the ceiling.
  2. For a deeper stretch, bend your outstretched leg back and over your body, so your knee is facing away from you.
  3. Repeat this process with the other leg, holding the pose for as long as you feel comfortable on either side.

Downward dog benefits

Downward facing dog provides a full body stretch, while also strengthening and working your:

Adho Mukha Svanasana helps improve your flexibility and control, and provides you a moment of active rest. It also increases blood flow to your head and upper body when you’re in the inverted V position. But because of this, you should talk to your yoga instructor, athletic trainer or healthcare provider before starting this position if you have:

“Facing dog pose tries to improve flexibility but also builds the strength to control that flexibility,” says Lorring. “If you’re feeling excessive stress to a certain part of your body, then you’re probably holding the pose for too long or you’re trying to go into a range that you’re not ready for. We can help you get there.”

8 Vitamins & Minerals You Need for a Healthy Immune System @ClevelandClinic

Who doesn’t want a healthy immune system? (Raise your hand. No one?) But did you know the role your diet plays in keeping it in top shape to protect you from toxins and infections?
Sadly, too many of us don’t eat enough of the fresh fruits, vegetables and other foods we need to keep ourselves healthy year-round. Healthy foods provide many substances including vitamins and minerals to keep us strong and healthy. You can’t just eat an orange or grapefruit or pop a vitamin pill and expect one quick burst of vitamin C to prevent a cold and to boost your immune system.
“A truly healthy immune system depends on a balanced healthy diet over time,” says registered dietitian Maxine Smith. “It’s like training for a battle and preparing your body ahead of time so it can through a good punch when attacked by viruses, bacteria and toxins. Other lifestyle practices such as regular exercise and good sleep will better prepare you for the battle.” 
With some exceptions, it’s best to get your vitamins and minerals from your food rather than in pill form. Smith shares some tips for some of the top vitamins and minerals your immune system needs to perform:

1. Vitamin C
Vitamin C may help prevent infections or shorten their stay. Citrus fruits are a standout, but did you know there are other good sources? It’s true! Smith recommends the following:
Spinach.
Kale.
Bell peppers.
Brussels sprouts.
Strawberries.
Papaya. 
Fun fact: vitamin C is in so many foods that most people may not need to take supplements unless a doctor advises it. Consult with your doctor before taking any vitamin C supplements

2. Vitamin E
Like vitamin C, vitamin E can be a powerful antioxidant that helps your body fight off infection. This important vitamin — part of nearly 200 biochemical reactions in your body — is critical in how your immune system functions. To get your vitamin E, think high-fat plant foods such as:
Almonds.
Peanuts/peanut butter.
Sunflower seeds. 
Oils such as sunflower, safflower, and soybean oil.
Hazelnuts.

3. Vitamin A#

Vitamin A is an infection-fighter and comes in two forms: preformed such as in animal foods such as fish, meat and dairy or from plant carotenoids. Tuna is a great source of preformed vitamin A. When it comes to carotenoids, go colorful
Carrots.
Sweet potatoes.
Pumpkin.
Butternut squash.
Cantaloupe.
Dark green leafy vegetables.

4. Vitamin D
Known as the sunshine vitamin, it’s one of the most important and powerful nutrients for supporting the immune system. Food sources are limited but include:  
Salmon. 
Mackerel.
Tuna.
Sardines.
Vitamin D fortified like milk, orange juice and cereals. 
In general, it’s best to get most of your vitamins from food, but vitamin D may be the exception to that rule. Talk with your doctor to find out if you need a supplement. 

5. Folate/folic acid
Folate is the natural form and folic acid is the synthetic form, often added to foods because of its health benefits. To get more folate, add more beans and lentils to your plate on a regular basis, as well as leafy green vegetables. Avocado is another tasty source. You can also get folic acid in fortified foods (check the label first).
Enriched pasta.
Enriched bread.
Enriched rice.

6. Iron
Iron, which helps your body carry oxygen to cells, plays a part in many of the immune system processes. It comes in different forms. Your body can more easily absorb heme iron (aka iron from animal products), which is abundant in:
Red meat (limit to smaller amounts and less often).
Chicken.
Turkey.
Canned sardines.
Oysters.
Clams.
Mussels.
Canned light tuna.
If you’re a vegetarian, have no fear. You can still find iron in:
Beans.
Broccoli.
Kale.
Iron-fortified cereals.

7. Selenium
Selenium seems to have a powerful effect on the immune system being important for preventing infections. Animal foods are the best sources, with the exception of Brazil nuts, that offer a whopping greater than 100% daily value in one nut. However, too much can be a problem, so keep to no more than one to two of these in a day. Look for selenium in: 
Seafood (tuna, halibut, sardines).
Meat and liver.
Poultry.
Cottage cheese.

8. Zinc
Zinc is needed for the production of new immune system cells. It’s found primarily in animal foods but can be also found in some vegetarian food like.  
Oysters.
Crab.
Lean meats and poultry.
Baked beans.
Yogurt.
Chickpeas.
Choose frozen when you can’t get fresh
Depending on where you live and what time of year it is, you can’t always get your hands on high-quality fresh produce. Keep in mind that buying frozen is a good option and can be quite convenient in our time-crunched world. Frozen food can still boost your immune system. 
“Manufacturers freeze frozen fruits and veggies at ‘peak’ ripeness, which means they’ll pack a similar nutritional value as their fresh counterparts,” she says. “Just choose plain frozen foods rather than those with added sugars or sodium.”​


Facebook

Twitter

Packed with nutritious oats for iron and zinc to strengthen the immune system @annabelkarmel @motherandbaby

motherandbaby

Follow

Liked by annabelkarmel and others

  • motherandbaby
  • If you’re up for a breakfast change for your little one, try this no-fail Purple Porridge by cookbook author and child food expert @annabelkarmel. It’s an easy four step recipe. 👩‍🍳

    Packed with nutritious oats for iron and zinc to strengthen the immune system, and sweet blueberries rich in vitamin C and antioxidants to support brain development. It’s a tasty and wholesome start to their day! 💜👶🏻🫐 #motherandbaby

Start your day with a hearty and nutritious 6-grain hot cereal that will keep you energized and satisfied. @MayoClinic

6-grain hot cereal

Start your day with a hearty and nutritious 6-grain hot cereal that will keep you energized and satisfied. Prepare a big batch over the weekend and enjoy a warm, comforting breakfast all week long. Top it with your favorite fruits or a dollop of yogurt for added natural sweetness.

Servings: 14
Serving Size:
½ cup

Nutritional Information Per Serving

  • 114 calories 
  • 1 g total fat
  • 0 g saturated fat 
  • 0 g transfat
  • 0 g monounsaturated fat 
  • 0 mg cholesterol 
  • 74 mg sodium
  • 21 g total carbohydrate 
  • 3 g dietary fiber 
  • 0 g total sugars 
  • 4 g protein

Ingredients 

  • ½ cup uncooked pearl barley
  • ½ cup uncooked red wheat berries
  • ½ cup uncooked brown rice
  • ¼ cup uncooked steel cut oats
  • 3 tablespoons uncooked quinoa
  • 2 tablespoons of flaxseed
  • ½ teaspoon kosher salt
  • 1 ½ quarts water

Directions   

  1. In a large saucepan, combine the barley, wheat berries, rice, oats, quinoa, flaxseed and salt.
  2. Pour water over ingredients, stir and bring to a boil over medium heat.
  3. Reduce heat to low and simmer for 45 minutes, stirring occasionally.

Dietitian’s tip:

Make a big batch of this cereal on the weekend and reheat all week. Top with fruit or yogurt to add natural sweetness.

Created by the executive wellness chef and registered dietitians at the Mayo Clinic Healthy Living Program.

Recipe: Perfect Chocolate Chia Pudding. 🥰 Sweet mix of coconut, cherries and chocolate @ClevelandClinic

A top-down view of a chocolate smoothie bowl (thick smoothie served in a bowl with a spoon) garnished with chia seeds, large coconut flakes and cacao nibs. Healthy vegan breakfast. The smoothie portion contains banana, chocolate, almond milk and ice.

This pudding is packed with health-promoting chia seeds, almond milk, cinnamon, cocoa, coconut flakes and dried fruit. It’s the perfect chocolate treat.

Ingredients

½ cup Chia seeds
1 cup vanilla almond milk, unsweetened
1 cup 2% milk (may use all almond for non-dairy option)
1½ tablespoons honey
1 tablespoon cocoa powder, unsweetened
1 teaspoon cinnamon
1 teaspoon vanilla extract
2 tablespoons coconut flakes, unsweetened
2 tablespoons dried tart cherries, or other unsweetened dried fruit

Directions

  1. Place chia seeds, milks, honey, cocoa, cinnamon and vanilla in a glass container with a tight lid.
  2. Seal and shake well to combine. Refrigerate for at least 5 hours or overnight.
  3. Serve topped with coconut flakes and dried fruit to garnish.

Note: For a smoother texture, blend pudding in a high power blender before refrigerating. Be sure to blend well to avoid a gritty texture.

Nutrition information

Makes 6 servings

Each 1/2 cup serving contains:

Calories 140
Total fat 7g
Saturated fat 2g
Trans fat 0g
Protein 4g
Total carbohydrate 16g
Fiber 6g
Sugar 7g
Cholesterol 5mg
Sodium 150mg

https://health.clevelandclinic.org/2017/09/recipe-perfect-chocolate-chia-pudding/

What’s causing your shoulder pain? 3 causes and fixes.@ClevelandClinic

cleveland shoulder pain

Shoulder pain, stiffness or weakness can make it difficult to carry out everyday tasks, like reaching for something on a high shelf, driving a car or brushing your hair. If you have pain that won’t go away, it’s time to see a doctor.

There are a number of possible causes of shoulder pain, but the most common causes of shoulder pain are rotator cuff injuries, rotator cuff tears and osteoarthritis, says orthopaedic surgeon Mark Schickendantz, MD.

1. Rotator cuff injuries

The rotator cuff is a group of four muscles and their tendons that surround the shoulder joint, and connect the shoulder blade to the upper arm bone. Bursae, small sacs near the joint, provide lubricating fluid that decreases friction among the bones, tendons and ligaments.

Rotator cuff problems occur through overuse, and they include tendonitis, strains and partial and complete tears of the tendon.

Tendonitis is when the rotator cuff tendon becomes inflamed and irritated; bursitis is when the bursae swell. Tendonitis and bursitis cause pain in the front and side of the shoulder, and you might also feel some stiffness.

“These two conditions can occur with activities that involve using your arms overhead, like tennis, yoga or painting a room,” Dr. Schickendantz says. “Often the pain will be worse at rest and improve with activity.”

Treatment involves rest, applying ice, and taking nonsteroidal anti-inflammatory drugs (NSAIDs), such as ibuprofen, which is sold under the brand names Advil and Motrin, or naproxen, which is sold under the brand name Aleve. After a few weeks, most people with tendonitis recover, Dr. Schickendantz says.

2. Rotator cuff tears

If you experience shoulder pain at night that makes it difficult to fall asleep or awakens you, you may have a tear in one or more of the rotator cuff tendons.

“Night pain is the hallmark of a rotator cuff injury,” Dr. Schickendantz says.

You also may have this type of injury if you feel pain when lifting your arm overhead and weakness in the shoulder when trying to lift anything above shoulder level.

A rotator cuff tendon can tear from a single event, like falling down on an outstretched arm. It also can happen from a motion that is repeated over time. For example, a plumber who frequently uses his or her arms overhead can develop a rotator cuff tear. The rotator cuff also can weaken with age.

Treatment is rest, avoiding aggravating activities, physical therapy, applying ice, and NSAIDs. Some people with more severe pain may be helped with a corticosteroid injection, which is a powerful anti-inflammatory medication.

“I usually reserve the use of corticosteroids for someone who has severe night pain and is not responding well to oral medications,” Dr. Schickendantz says.

Surgery to repair the rotator cuff tendon is an option if these measures don’t give relief.

3. Osteoarthritis

Osteroarthritis happens when cartilage, which is the cushioning material that covers the ends of your bones, deteriorates, which leads to pain and stiffness.

Osteoarthritis causes a deep ache in the back of the shoulder. As osteoarthritis worsens, stiffness in the shoulder develops. People with osteoarthritis typically lose the ability reach behind their back.

“Patients often say they are unable to scratch their back or thread a belt,” Dr. Schickendantz says.

Osteoarthritis symptoms develop over time. For some people, an old shoulder injury from sports or some other activity, may kick off the degenerative process that years later results in osteoarthritis. But many people have no specific cause — it’s just wear and tear over time.

Treatment for osteoarthritis of the shoulder is similar to treatment for a rotator cuff tear, involving physical therapy, NSAIDs and ice. If the condition is severe, you can undergo shoulder joint replacement surgery, which is similar to joint replacement for hips and knees.