Today we're taking a step toward better health! It's National Walking Day, a reminder that physical activity can make a powerful difference for your heart and brain. This year, I’m grateful to walk alongside my longtime friend, Dr. Mehmet Oz.@drozcms and I hope today inspires… pic.twitter.com/GOCtp5bupn
Cabbage often—and unfairly—gets overlooked, with flashier veggies and protein-dense superfoods getting all the attention. But as far as nutritional food options go, the leafy green is pretty hard to beat. A staple in different cuisines (American coleslaw! Middle Eastern malfouf! Chinese suan la bai cai!), cabbage has been a longtime favorite amongst global chefs.
“Much of this stems from its versatility,” Woldy Reyes, chef and author of the cookbook In the Kusina: My Seasonal Filipino Cooking, tells Vogue. “We are seeing a growing trend of chefs utilizing it as a centerpiece, such as cabbage steaks, rather than as a side dish. The culinary appeal has never been stronger.”
“Its popularity stems from its ability to transform,” adds Tatiana Mora, chef of plant-based Michelin star restaurant Mita. “It can be eaten raw, fermented, steamed, roasted, or sautéed, consistently providing flavor, texture, and nutrition. I love it because it is a noble vegetable that grows easily, keeps well, and can be used almost entirely, making it perfect for a conscious and respectful approach to cooking.”
It’s accessible, easy to cook, and delicious. Here are all the reasons cabbage deserves a seat at your table (get it?) in 2026.
What is cabbage?
Cabbage is a leafy green that is part of the brassica plant family (which also includes broccoli, cauliflower, brussels sprouts, and kale), says Amy Shapiro, RD, registered dietitian and founder of Real Nutrition. It comes in several varieties, but the most common ones you’ll see are green, red (or purple), and savoy. What makes cabbage different from other leafy greens is its density and durability. “It’s heartier, stores longer, and holds up well to cooking, fermenting, and shredding,” Shapiro says. “Nutritionally, it shares many benefits with other cruciferous vegetables, but it’s often milder in flavor and more versatile across cuisines.”
The Benefits
Besides its versatility, one of the main benefits of cabbage is its many nutrients. Shapiro lists other main benefits of the leafy green:
Supports Gut Health
Shapiro says that, because cabbage contains fiber and other compounds that support digestion, eating this leafy green can benefit the gut bacteria and boost gut health.
Anti-Inflammatory Properties
Cabbage is also rich in antioxidants and phytonutrients that studies have shown can reduce inflammation, she says.
Boosts Heart Health
Along with fiber, cabbage has potassium, which supports healthy cholesterol levels and blood pressure. Cabbage also has vitamin K, which is essential for blood clotting (and bone health). Shapiro points to red cabbage in particular, which she says contains antioxidants called anthocyanins that studies have shown can improve brain and heart health.
Regulates Blood Sugar
Cabbage is low in calories and carbs while being high in fiber, which can help stabilize glucose levels in the body.
Blackrock Health Womens Health Centre is officially open at 2-5 Warrington Place, Dublin 2!
From gynaecology to menopause, cardiology to pelvic health – we offer a wide range of services for every stage of your health journey.
Don’t delay your well-being and book your appointment today.
You can access our clinic directly through our website, or with a referral from your GP. Learn more about our patient-centred approach and book an appointment here: https://ow.ly/jGy850XsMvR
Here’s a fact that may surprise you: By the year 2020, depression is projected to be a leading social and economic burden worldwide — second only to coronary artery disease! Psychotherapy and antidepressants are effective but aren’t for everyone.
But there’s another treatment for depression that’s free and available to everyone: exercise. It will also lower your blood pressure, improve your cholesterol profile, help control blood sugar, and reduce your risk of heart disease, diabetes and common cancers. And, of course, help you achieve or maintain a healthy weight.
If you run regularly, whether it’s an easy jog around the block to stay fit or an intense training regimen to prepare for a marathon, you need proper nutrition.
Here are some tips to help keep runners well-nourished and ready to win.
Foods for Runners and Joggers
A good diet can boost your physical health and help you meet your fitness goals. Make sure your meals emphasize the following basic components:
Fruit and vegetables for vitamins, minerals and antioxidants
Lean protein such as fish, poultry, beans, lentils and tofu
Healthy fats such as olive oil, avocado and nuts
Healthy carbohydrates such as rice, whole grain breads/pastas and oatmeal
Individuals may have different optimal balances, but in general, people who include running or jogging as part of their fitness regimen should get 60% to 70% of their calories from carbohydrates, with lean protein and healthy fats each accounting for 15% to 20% of their remaining calories.
Don’t skimp on carbohydrates
Although low carbohydrate diets are popular go-to’s for people wanting to lose weight, they’re not ideal for distance runners, who thrive on carbohydrates for endurance.
That is why very low carbohydrate diets, such as the ketogenic diet, plus running is not a good idea. Experts do not recommend keto to runners unless they have been told by their doctor that this a medically safe option for them and they are being monitored while in ketosis.
Distance runners need more carbs than people who aren’t training. Undereating carbohydrates can be hard on your body and affect your recovery after your run.
Here’s why: Running uses both glucose in the blood and your stores of glycogen. Glucose is the form of sugar that circulates in the bloodstream, and glycogen is the sugar stored in your liver and muscles that acts as the primary fuel for endurance exercise.
Eating plenty of carbs helps ensure that these energy stores are ready to support your training. When those stores get too low, runners are more likely to run out of energy and “burn out” or “hit a wall” while training.
Running Diet — Vitamins and Minerals
Running changes your body and your nutritional needs. Often when people start a running regimen, they are trying to lose weight or get in shape quickly, and they don’t realize they need to adjust their diet.
Especially in women runners, dietitians report seeing a tendency to overdo the running while not eating enough, and this can have an effect on health if they do not adequately replenish lost vitamins and minerals in their diet.
For women in particular, calcium and vitamin D are essential for bone health to avoid loss of bone mineral density and the risk of stress fractures.
For more vitamin D, include these foods in your meals:
Vitamin D-fortified dairy and almond, soy or rice based beverages
Eggs
Cereal fortified with vitamin D
Tuna
Salmon
For more calcium, try:
Yogurt and cheese
Tofu
Edamame
Almonds
Canned fish with bones (such as sardines)
Iron deficiency can affect women and even have an impact on their running performance. Menstruation puts people at higher risk of iron deficiency, and if iron isn’t replenished in the diet, decreases in hemoglobin can occur and bring on anemia. Hemoglobin is what carries oxygen throughout the body, including the muscles, so if there is a deficit, the muscles may feel the effect of insufficient oxygen during exercise.
Iron-rich foods include:
Poultry and other meat
Legumes, such as peas and beans
Dark, leafy green vegetables such as kale
Dried fruits and raisins
Iron-fortified breads and cereals
Dietitians recommend eating eating iron rich foods in combination with foods high in vitamin C, such as citrus, bell peppers or berries, since vitamin C helps increase the body’s absorption of iron.
What to Eat Before Running ― and When
The best time to eat a full meal is about two to three hours before you hit the road, track or trail. Have a good source of carbs paired with protein, making sure the meal focuses on a healthy carb source.
If it’s been more than three to four hours since you’ve eaten, a carbohydrate-rich snack a half-hour before running can ensure you have adequate glucose available before you head out. Directly before a run, it’s best to stick with easy-to-digest carbohydrates to avoid gastrointestinal [GI] distress such as cramping or diarrhea.
Try these:
Bananas
Applesauce
Crackers, pretzels or cereal
White bread
Potatoes
Glucose Boosters for Long Distance Runners
If you are training for a marathon or distance event and are going to be out for over an hour, you will want to bring some fuel with you. Energy drinks, gel tubes and other sources of quick blood-glucose boosters are available, but you can also use something as simple as fruit snacks.
Try practicing with these items as you train so you can pick the formulas that are best for you, and you can work on accessing and ingesting them smoothly without breaking stride.
What foods should runners avoid?
Before a run or the night before a big race, Eidel recommends going easy on:
Spicy foods or foods overly high in fat, which can cause GI upset
Foods that are very high in fiber, which can cause gas and cramping
Caffeine ― Although it is tempting to grab a caffeine boost right before a run, runners should remember that for some people, caffeine can stimulate the GI tract, which can result in diarrhea or the need for an emergency bathroom break
Does carb-loading work?
It might. Carb loading is the practice of eating a lot of carbohydrates ― particularly those that are easily absorbed, such as white bread, pasta and rice ― for 24 to 48 hours before a big race or distance run, to shore up your body’s stores of glycogen and lessen the risk of burnout before finishing the event.
Some studies show carb loading is beneficial for people preparing for a race, but it’s important to make sure during that time you’re also allowing your body to rest and giving it time to store what you are ingesting. The number of carbohydrate grams will be differ from person to person, but in general, evidence shows carb loading can be beneficial prior to a distance event.
In contrast, casual runners likely do not need to carb load. Ensuring that their day-to-day diets include extra carbohydrates can be sufficient.
What to Eat After a Run
It’s common for people not to feel hungry after a run, but a snack or light meal of complex carbohydrates and protein within the first hour after running can help replenish glycogen stores and to support recovery and rebuild stressed muscles. For example:
Peanut butter and banana
Egg on toast
Sandwich with deli meat
Pasta with meat or plant-based protein
Veggie burger on a bun
Protein shake or smoothie
Running to Lose Weight
If you’re interested in running as part of a weight loss plan, getting adequate nutrition is a must. Even casual running or jogging burns calories and can be hard on the body. Runners can become undernourished at first because they don’t understand how much energy they’re burning when they run and what they need to properly recover.
Eating enough is also essential to building muscles, which can aid in fat burning ― a plus for people working on achieving or maintaining a healthy weight.
For optimal weight loss, your plan should not rely on running alone but also include strength training and proper nutrition.
Listen to your body
If you run regularly, you should pay attention to the effects of what you eat and when, especially on running performance. Learning what works best for you can take some time and a little trial and error, but it is worth it, since running, jogging and other regular aerobic exercise offers so many health advantages.
Always feel free to consult a dietitian or doctor, and listen to your body if you’re not keeping up with your training goals.
Registered dietitian Lara Whitson, RD, LD, shares how watermelon is actually healthy for you, along with five watermelon recipes.
Is watermelon healthy?
Watermelon is 92% water. No surprise there, considering it’s in the name. But more than keeping you hydrated during hot summer days, watermelon has a number of other health benefits. It’s packed with antioxidants like lycopene that can help protect against chronic diseases like diabetes and cardiovascular disease.
And when eaten regularly as part of a healthy balanced diet, it can help make you feel fuller longer. With a low amount of calories, sodium and cholesterol, alongside higher amounts of calcium, vitamin C and magnesium, watermelon is one fruit you don’t want to miss out on year-round. Even the rind and its seeds offer some benefits.
“You can stir-fry the rinds with other vegetables and add spices to the seeds, like you might do with pumpkin seeds, for an easy and healthful snack,” says Whitson.
Watermelon basil granita
This shaved ice dessert gets a fruity twist with watermelon chunks. It also pulls in star ingredients like fresh lime juice and basil leaves, which offer their own health benefits for a refreshing mid-afternoon sweet escape.
Watermelon, tomato and herb salad with feta
Calorie-conscious dishes can still go big on flavor. This refreshing salad, perfect for picnics and cookouts, pairs watermelon with tomatoes bountiful in benefits, alongside red wine vinegar, fresh mint, almonds and feta cheese.
Fresh watermelon fruit smoothie
This is just one of several ways to crank up your chill summer drinks: Puree 1-1 1/2 cups chopped watermelon with 1 cup ice and a little water or fresh juice for a sip-worthy smoothie as you soak in the sun.
Watermelon salad with cucumber, tomato and almonds
This recipe doubles down on the use of veggies by incorporating beefsteak tomatoes, cucumber, a fresh ear of corn and basil, along with a hearty serving of watermelon for a subtly sweet finish.
Fruit salad spring rolls
Not only is this sweet snack filling, but it also puts a dessert-like twist on classic Vietnamese and Thai spring rolls. By wrapping julienned watermelon, green apple and pineapple in spring roll wrappers made from rice paper, and creating a dipping sauce with Greek yogurt and tahini, this recipe makes for a great palate cleanser for any summer cookout.
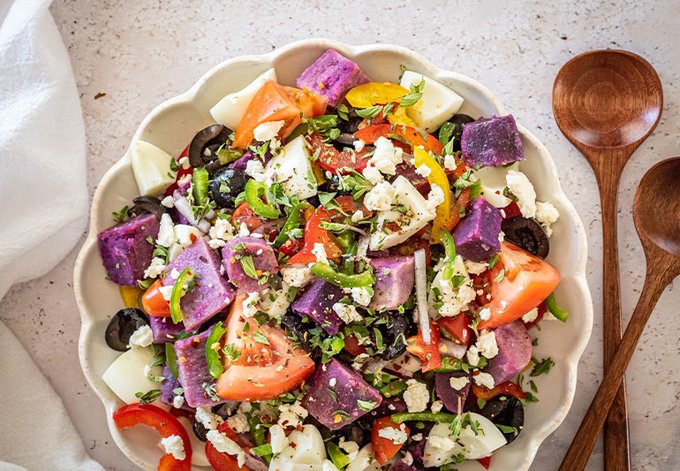
Peru has been cultivating potatoes for more than 6,000 years in the high Andean slopes near Lake Titicaca.
A stroll through the public markets reveals a startling number of sizes, shapes and colors — including the famous Peruvian blue potatoes with their purplish-blue skin and flesh.
It’s fun to use these blue potatoes, but if your market doesn’t carry them or if you prefer other potatoes, you can always use small red or white potatoes.
Ingredients
Kosher salt 1 1/4 pounds small Peruvian blue potatoes 1/4 cup minced red onions 1 red bell pepper, seeded and diced 1 yellow bell pepper, seeded and diced 1 large tomato, seeded and chopped 1 jalepeño, seeded and minced 3 tablespoons red wine vinegar 3 tablespoons extra virgin olive oil 1 teaspoon sugar substitute 2 hard-boiled egg whites, chopped 2 tablespoons chopped fresh oregano 1/2 cup crumbled reduced-fat feta cheese 2 tablespoons sliced black olives, optional
Directions
Bring a pot of lightly salted water to a boil. Simmer the potatoes until cooked through, 15 to 20 minutes, depending on size. Drain and cool. Quarter or slice into bite-sized pieces and place in a bowl.
Combine the potatoes and the onion, bell peppers, tomato, jalepeño, vinegar, oil, 1/4 teaspoon salt (if using), sugar substitute, egg whites, oregano and cheese. Refrigerate until ready to serve. Garnish with olives, if using.
Nutritional information (per serving)
Makes 8 servings
Calories: 200 calories (31% from fat) Total fat: 7 g Saturated fat: 1.5 g Protein: 7 g Carbohydrate: 31 g Dietary fiber: 2 g Cholesterol: 5 mg Sodium: 95 mg Potassium: 109 mg